
Sending critical comms from your app
When your Critical Comms module is set up there will be two buttons, one will be to display the security messages and the other to send messages.
Sending a template
To send a template from your app you will need to go into the button that has been set up for sending a critical message. Here you will see a list of your available templates.
Pressing the menu button on the left will show you a list of the categories that you will have created in the CMS.
You can send a template simply by selecting to the one you want to issue and press the send button at the bottom.
After you press this you will be given the option to make edits to the template before you send it, or if it is correct, go straight to send.
If you have no edits to make, press send now. Next, you will be able to check the access levels you are sending the message to and change if necessary. The access levels available for selection are based on what is set up in the groups tab of the template you have selected.
Once you are happy press next.
You will have one final screen that will give you an overview of the number of stores and people that will be receiving the message. If you are happy, press send and your template will be sent, if not, press the back button to edit access levels or leave without sending.
Editing a template before sending
Once you have chosen your base template, rather than pressing send now, press the edit option. There are a number of options that can be edited on the fly before sending your critical comms message.
- Item content
- Push notification
- Text message
- Voice message
- Response buttons
- Multi-language
If your CMS is set up with additional language support, the first option when editing a template will be the language you are editing. We recommend going through everything in one language and then scrolling back to the top and changing your selected language and checking everything is OK and sending.
Next is the item content. You can make any edits here to the item that will be added to the app. Just press on the text and edit as necessary.
The following settings will either be on or off based on what is set up in the CMS template. By toggling the options on or off you can add or remove each of the features.
When you toggle an option on, the screen will expand to allow edits.
For the push notification, you can change the title and the content of the push message that will be sent to users' devices.
Next is the email option, you can customize the text or turn it off completely if you like.
You are also able to turn the SMS text message and voice message on or off and edit both the content and the recipients.
Finally are the response buttons. These are the buttons that appear at the bottom of the item in the app for your users to be able to respond quickly and easily. They will be pre-filled with the template settings but you can edit both the button text and the response before pressing the next button.
Once you press next you are able to see the access level that will receive the communication and make changes if required. The options here are based on the groups that have been set as allowed when creating the base template in the CMS. Once you are happy with this, press next to go to the final overview screen.
Here you can see exactly how many stores and people will be receiving your message. If you are ready, press Send Now and your message will be sent based on the edits you made to the template.
Creating a message on the go
Many emergency situations can’t be predicted so there is a good chance there will not be a template ready for it. In this situation, you can quickly create an item to be sent in the app.
Go into your Send Security Message button and in the top right is a plus symbol, this will open the creator.
The first section is for creating your item. You’ll need to give it a title and add your message.
A push notification will be sent automatically using the title and content from the message you have created, however, if you would rather customise it, you can by turning on the "Customise push" toggle"
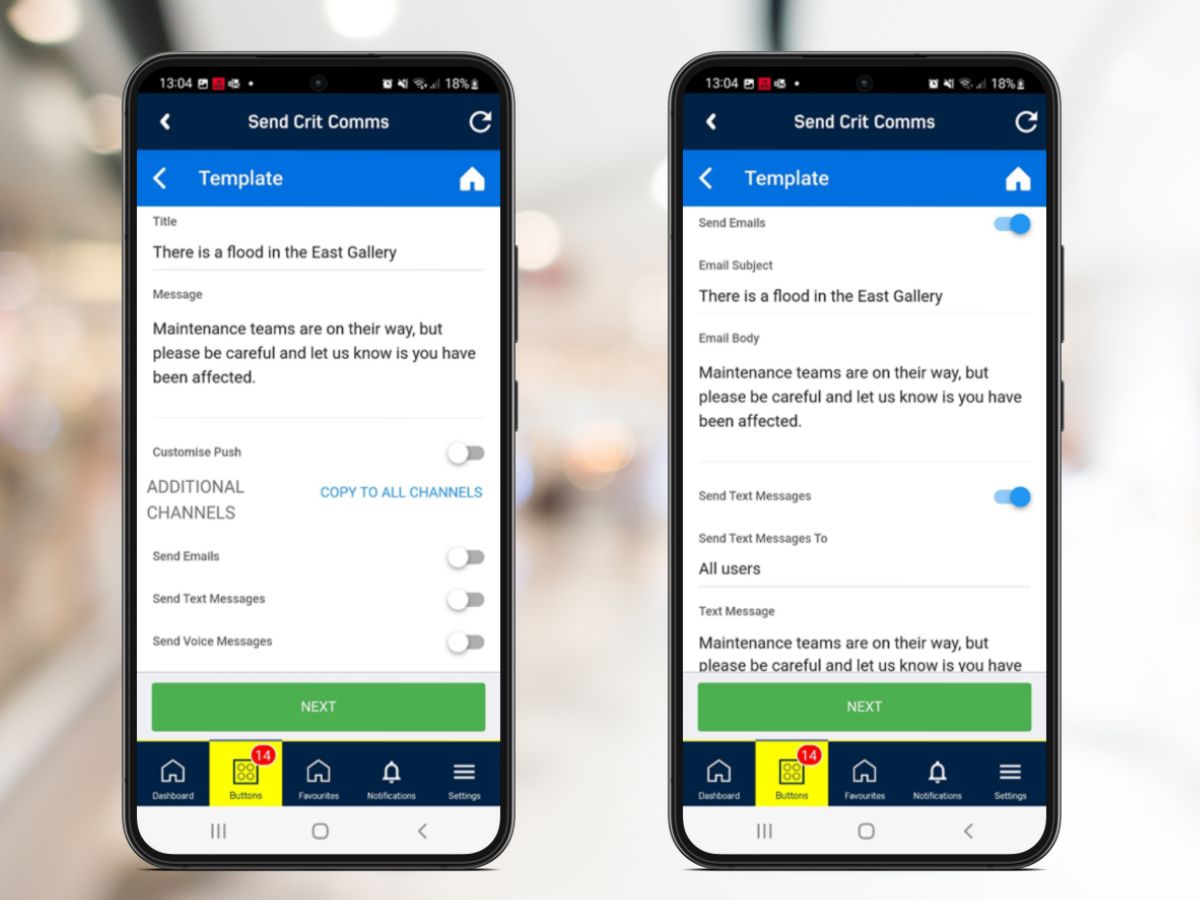
Once you have completed your main content you can then decide if you would like to send an email, SMS text, and voice call as well.
You can write these individually by turning them on and adding content. Alternatively, if you want to use the same message, you can simply press the "Copy to all channels" text to activate all of the options and fill them with the text from your initial message in seconds. If you need to, you can then edit them or deactivate any you do not want by turning the toggle switch off.
If you do not have access to our SMS text and voice services, please reach out to your Customer Success Manager who will be able to give you more information.
When you have completed your message, press next to choose your access level. The options available here are based on what has been set up in the Allowed Access Levels section of the Setting in the Critical Comms section in the CMS.
Once you have selected, press next to get to the overview screen where you will see a breakdown of the stores and people that will receive your message, if you are happy with it, press send now to distribute your message.

Post sending
Once you have sent your message, a report will be generated to show you the delivery. At the bottom of the screen, you are given the option to save what you have sent as a new template.
This option will be available whether you have created a message on the fly or sent a template. If you save a template after sending it, it will not update the existing one, but save as a new one that you can then see in the app or the CMS where you can make further edits to refine it if you like.
FAQ
How do I know that a message has been sent successfully?
In the CMs, you can find a report section. In this report, it will detail all of the Push notification, emails, SMS messages sent and calls that have been made.
Why is there a pause before the phone message?
The automated calls use answer machine detection technology. This ensures that even if someone does not answer the call, a message will be left for them.
For this to work there will be a delay while the system works out if it is a human or a machine that has answered.
If the call is picked up, the message will start to play when the recipient speaks their greeting. If nothing is said, there will be a 5 - 6 second pause due to the answering machine detection.
How do I know if a call was answered or not?
In the report, if the row has [machine] at the end of it, it means the call was not answered by a person.